
Google Search Console: The Definitive Guide

Google Webmaster Tools, now Google Search Console, is a powerful tool made for webmasters by Google. It allows website owners to check indexing status and optimize visibility of their websites.
Here are some benefits and reasons why you MUST use Google Webmaster Tools:
- Make sure that Google can index your website
- Send Googlebot manually
- Monitor and resolve malware
- Learn queries caused your site to appear in SERP (Search Engine Results Page)
- Which pages perform better in SERP
- How does your website work on mobile (is it responsive)
In this blog post, I’m going to show you every single feature of GWT.
How To Add & Verify a Website
The first step is to add and verify your websites which perfectly makes sense since you need to prove to Google that you’re actually a website owner.
Once you open Google Search Console, click on ADD A PROPERTY button.

After that, you have to enter URL to your site. Don’t forget that URLs like:
- https://www.jellymetrics.com
- https://jellymetrics.com
are completely different things in Google’s eyes. This is also a reason why you always need to choose the main URL (www or non www version).
Furthermore, not chosen URL have to be a 301 redirection to the main URL. So, decide which one is the right URL and click on Add. The next step is the verification process.

There are lots of ways of how you can verify your website, and they’re all separated into two groups (methods):
- Recommended methods
- Alternate methods
The first one through Google Tag Manager. If you haven’t added Google Tag Manager, you should create an account and send a piece of code to your developer. Anyway, if you’re interested in other methods, here is the list:

They’re also very simple. As for me, I’d pick Google Analytics, like most of the websites.
But, let’s assume you want to use the first method from the list - HTML file upload.

Once you click, you’ll get a simple HTML tag that needs to be added to your website.
In other words, you need to call your developer. For that reason, I recommend you to verify Google Tag Manager once, and after that, you can use GTM as an installation method for all other tools.
Finally, when you click on VERIFY here’s what you should see.

Dashboard
After you verify your website, you should open that property.

Once you do that, you’ll see a dashboard which is the place where everything begins.

On the left side, there’s a menu which contains:
- Dashboard
- Messages
- Search Appearance
- Search Traffic
- Google Index
- Crawl
- Security Issues
- Other Resources

On the right side, you can see three widgets:
- Crawl Error
- Search Analytics
- Sitemaps
This is nothing else but a brief indication of last trends and events about your site.

Now, let’s learn more about Search Appearance.
Search Appearance
Structured Data
Structured Data helps Google to understand your content much better. Google also uses it to display rich snippets in SERP. To me, the best example are recipes.

Structured Data helps Google to know:
- How many minutes are needed for making a pizza?
- What is the rating of specific recipe
- How many calories are there?
You can use Structured Data for recipes, books, movies, TV series, products, places, restaurants, review, etc.

So, let’s click on Structured Data in the menu and see if you have structured data implemented.
Here are results.

It appears like there are total 196 items, but 4 of them contain some sort of an error.
If I click on Review, I can see what are those errors.
 It appears like some URLs are missing author’s name.
Rich Cards
Let’s see what official Search Console Help says for Rich Cards.

There are two groups of errors:
- Critical errors
- Non-critical errors
Obviously, fixing the critical errors is a top priority. Once they’re solved, we can fix non-critical errors.
Here’s how my Rich Cards Report looks.

After I click on Recipe card type I can see in details if there’s something I can improve.

Voilà! There are only some non-critical errors to solve. Specifically, some recipes don’t have:
- Preparation time
- Aggregate rating
- Nutrition
- Cooking time
- Description
I mean, this REALLY helps a lot. I guess a guy who helps me on this cooking site made a mistake, so I can fix it as soon as possible once I get introduced.
In fact, Rich Snippets are NOT equal to Rich Cards. They are similar, but still not the same thing.
Now, I understand this might be confusing, but don’t worry, I’ll explain. Google has introduced Rich Cards on May 17, 2016.
They both have one thing in common- using schema.org structured markup.

Rich Cards appear only in mobile results and helps mobile users to preview your content.
Finally, let me say again that implementation is the same as for structured data.
Data Highlighter
Whenever you want to use structured data, you need to hire a developer to implement it for you, right? Well, not anymore.

We have a data highlighter. Just click on Start Highlighting and a modal dialog will appear. You need to enter the URL of a typical page on your site.

It can be a blog post, recipe, movie page, etc.
Whatever is a typical page. Once you click OK, you need to select a piece of content and choose what it belongs to.

For example, How To Start a Successful Blog: Step By Step belongs to Title.
Next, September 26, 2016 belongs to Date published.
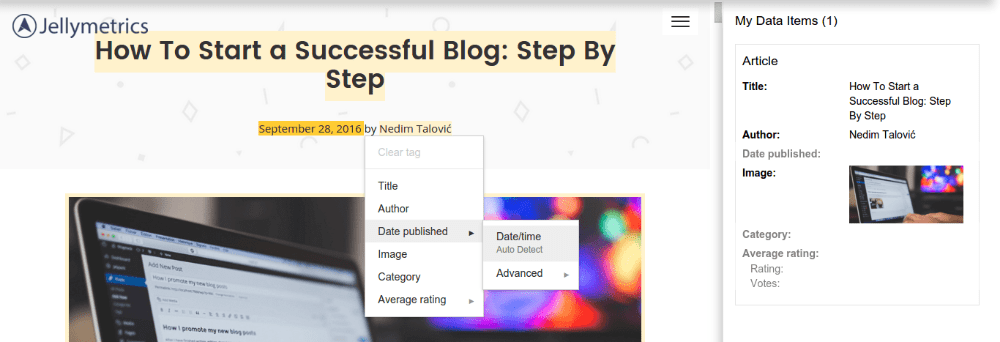
and so on. You get the point. After you highlight all the data, you simply need to create a page set.

It’s simple. You select all pages and name it as Articles (e.g.). After you finish with data highlighting, you’ll see the list of your page sets.

That’s it. Now, let’s learn about HTML Improvements.
HTML Improvements
This is quite simple.

It just tells you if there is:
- Duplicate meta descriptions
- Long meta descriptions
- Short meta descriptions
- Missing title tags
- Duplicate title tags
- Long title tags
- Short title tags
- Non-informative title tags
- Non-indexable content
Numbers on the right tells us how many pages are affected by the specific error. For example, your title and description of every page have to be unique.
Also, meta description length is very important. It can’t be too long, but shouldn’t be too short either. Your description should be between 150 and 160 characters.
When it comes to the title, you should have between 50 and 60 characters of a title tag, or as many characters as it can fit into a 512-pixel display.
If you keep your titles under 55 characters, you can expect at least 95% of your titles to display properly, says Moz.
Accelerated Mobile Pages
AMP is a technology which allows pages to be served faster because they are cached in Google’s AMP cache.
This is a project invented from Google whose goal is to make really fast mobile pages.
If you’re wondering what about Facebook, another tech giant, I’d like to say that they introduced Instant Articles project from Facebook.
Anyway, AMP has limited the number of HTML tags you can use. Also, some parts of CSS are not allowed.
Finally, JavaScript is not allowed at all, but there is a helpful JavaScript library.

Once you implement AMP, you’ll see which AMP pages are indexed, and which pages contain some sort of an error.
Search Traffic
Search Analytics
For me, this is the best part of Google Search Console because it tells me how well does my site perform over the time.
There are four metrics (Clicks, Impressions, CTR, Position) whose data can be grouped into a few categories such as Query, Page, Country, Device, etc.

For example, I can see how many clicks and impressions every query that I rank gets.

Furthermore, I can display which pages perform the best and for which queries. Simply click on Pages and that’s it - queries are listed.
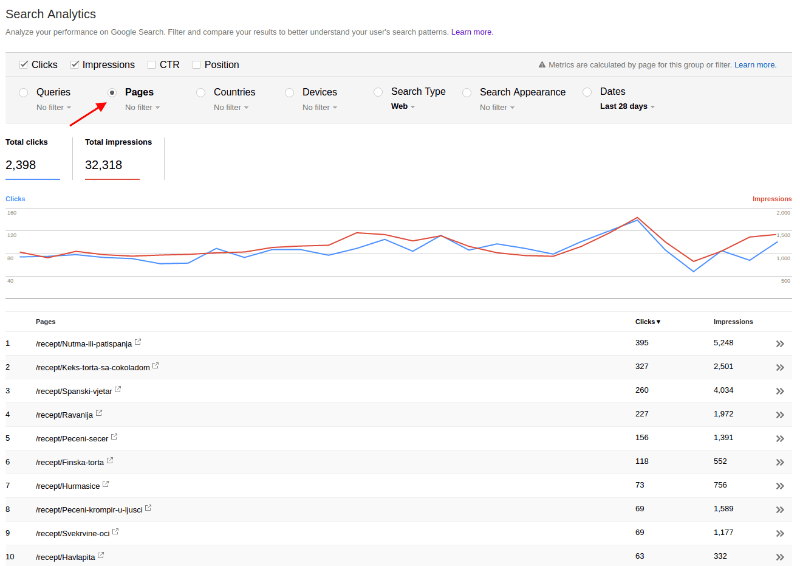
Now, when I can click on some page URL and see for queries for that page ranks.

What’s definitely interesting is that I can see how many queries resulted were actually rich results in the last 90 days (e.g.).
Here is how.

Just group by Search Appearance and that’s it. For this example, I know there were total 1,200 impressions that resulted as a rich result from a total of 86,895 queries.
So, only 1.38% were rich results. Let’s dig little deeper. If I show only Desktop results and group by Search Appearance it says that there were no rich results for desktop users.

Furthermore, I can compare Tablet vs Mobile users. Just click on Desktop and after that choose Compare devices...

and choose Tablet VS Mobile.

Finally, the results are here.

Mobile appeared in 82.58% queries, tablet devices in 17.42% and desktop devices in 0%.
However, it’s still only 1.38% queries where rich results appeared.
A possible reason might be that this site is not mobile ready, but still, nothing guarantees your site will appear, Google says.
Links to Your Site
Personally, I think that links are still the most important Google ranking factor, no matter what they say. When I say links, I mean natural links, not the spammy ones.
Google Webmaster Tools is a great way for checking a number of backlinks, especially for those who are running a new startup company without an investor (bootstrapping company).
 There are three sections:
- Who links the most
- Your most linked content
- How your data is linked
I’d recommend you to check is your most linked content the most visited. I’m 100% sure that there is a strong correlation.
Now, you can click on More in Who links the most section, and after that on Download latest links.

I suggest downloading in Google Docs format so you can play there with the list of latest links.
For example, playing with Pivot table can show you backlinks growth trends.

If you don’t know how to get this, I strongly recommend you to learn from our tutorial.
Internal Links
Since internal links are one important Google ranking factor too, this section is really important. It tells you which pages are the most linked. Here is the list of typical pages that are the most linked:
- Product
- Pricing
- FAQ
- Terms of Service
- Privacy Policy
- Contact
These pages are the most linked because your almost every page has its links in the menu.
However, I can see some of the most linked blog posts.

As you can see, one of the most linked pages are blog posts like How To Advertise on Facebook, How To Find and Verify Email Addresses, etc.
Please keep in mind that footer can also influence on a number of internal links (if you have links to your blog posts as we do).

Manual Actions
This is a place where you can see if manual actions have applied on your site.

There are two types of displayed actions:
- Site-wide
- Partial matches
The first one affects the whole site, and the other one affects only individual URLs or sections. Here’s how it looks when manual action has applied.

As you can see, there are two sections:
- Reason
- Affects
However, it’s very important that only 1,000 matches will be displayed. Google won’t show every single URL when they find a pattern.
There are several reasons why manual actions may apply to your site:
- Hacked site
- User-generated spam
- Spammy free hosts
- Spammy structured markup
- Unnatural links to your site
- Thin content with little or no added value
- Cloaking and/or sneaky redirects
- Cloaking: First Click Free violation
- Unnatural links from your site
- Pure spam
- Cloaked images
- Hidden text and/or keyword stuffing
Once you’re sure that you’ve fixed causes of manual action, you can request a reconsideration.
International Targeting
Within this section, you can target your audience based on location and language settings. For example, if your ideal customers are those who speak Spanish and who’re based in the United States, you can easily target them here.
Firstly, you need to click Language tab and see if your site has hreflang tags. If not, you can always set your language by three ways:
- Page-level markup
- Sitemaps
- HTTP headers
Now, when you set the language in your code, you can use Language tag to be sure that your hreflang tag uses the correct local code.
Next, you can click on Country tag and enable targeting users in the specific country.

Here is how it works.

That’s it.
Mobile Usability
You probably know that Google uses mobile usability as a ranking factor. They announced it on February 26, 2015.

In Google Webmaster Tools, you can always check which pages are not mobile ready. As for me, I have one old site that I use for different tests and that site isn’t mobile ready.
Here is how it looks.

As you can see, there are different issues:
- Clickable elements too close together
- Viewport not set
- Content wider than screen
- Text too small to read
Furthermore, I can check specific URL by using Mobile-Friendly Test.

However, the beautiful part of this section in Google Search Console is that it tells me for the whole site.
Google Index
Index Status
This section is really simple. Here you can see a total number of indexed pages of your site and one graph with its trends.
This is how it looks.

Also, you can always click on Download chart data and create your own custom graphs.
Clicking on another tab (Advanced) will show you if there are pages that are blocked by robots.txt.

Blocked Resources
This section shows if there are site resources that are blocked to Googlebot.

What is the difference between Blocked Resources and Blocked by robots in Index Status?
Great question! In Index Status, you can see if Googlebot can’t access due restrictions in robots.txt, but in Blocked Resources, Googlebot can access, but there are some resources that Googlebot can’t access within that page.
For example, Googlebot can’t access to JavaScript, CSS or some images (but users can).
Remove URLs
Sometimes Google indexes a page that you don’t want to be indexed.
Assuming you don’t want to index pages that are allowed only to registered users or PDF version of the page, you can always remove that page from search results in Remove URLs.
 Just click on Temporarily hide, enter desired URL, and click on Continue.
After that, just choose a request type:
- Temporarily hide page from search results and remove from cache
- Remove page from cache only
- Temporarily hide directory
and submit the request.

Please keep in mind that this is only a temporarily removing from search results. For permanent removal, you have to block access by robots.txt (e.g.).
Crawl
Crawl Errors
Your goal is to have a site without crawling errors.
Fortunately, Google has provided us a solution to make sure it happens. Crawl errors are available both for desktop and smartphone. Furthermore, there are two types of errors:
- Server error
- Not found
A server error occurs when connection timeout happens, where there’s no response, etc, and Not found is a classical 404 error.

I can also see if there are DNS, server connectivity, and robots.txt fetch errors.
However, when I resolve an error, I simply mark it as fixed, but it’s going to appear when Googlebot visits your site again (if not fixed).
Crawl Status
When Google crawls your site, it actually uses your bandwidth.

In Crawl Status, you can see:
- How many pages are being crawled per day
- How many kilobytes are downloaded per day
- How much spent downloading a page (in milliseconds)
If you think that Googlebot takes all your bandwidth, you can limit a frequency in robots.txt. Keep reading this blog post and you’ll learn how to test a robots.txt file.
Fetch as Google
If you were wondering how to get Google to crawl your site immediately, then this is feature is for you.
Enter the desired URL and click on FETCH. For example, I can fetch the URL from my previous blog post - How To Gain Followers On Twitter.

Once I click on FETCH the list will be there. The next step is Request indexing.

After that, just choose the method:
- Crawl only this URL
- Crawl this URL and its direct links

Please keep in mind, the second option is available only 10 times per month because it will recrawl entered URL and its directly linked pages.
robots.txt Tester
I hope you know the purpose of robots.txt. If not, it doesn’t matter, it’s quite simple. Robots.txt is an instruction which tells crawlers which pages are disallowed for crawling.
Fortunately, in Crawl - robots.txt Tester, you can see the latest version of robots.txt and below that, you can enter a URL to check if it is blocked.
For example, if I enter the URL of How To Get My Website On Google In 7 Simple Steps, I can test if the URL blocked.
The result is here.

It is allowed. But, let’s check if crawling wp-admin is disallowed (which should be).

It’s blocked. Fine.
Sitemaps
Sitemap is a list of pages your website has. It tells to Google and other search engines about the organization of your site content. Once Googlebot read this file, he’ll crawl your site easier.
Now, let’s see how to add a sitemap. Firstly, open Sitemaps.

After that, click on ADD/TEST SITEMAP.

The next step is to enter the URL of your sitemap. For most sites, it’s sitemap.xml.

Once I click on Submit, I’ll see that my sitemap has successfully submitted.
After some time, I’ll see that the sitemap has been indexed. If you don’t know how to create a sitemap, you can use Google XML Sitemaps plugin, which is one of the most installed plugins for WordPress.
URL Parameters
Use this feature only if you're sure how parameters work. Incorrectly excluding URLs could result in many pages disappearing from search.

As you can see, with using URL Parameters, you need to be careful because it’s a fairly advanced feature.
When you see the message as you can see in the photo above (Currently Googlebot isn't experiencing problems with coverage of your site.), it’s not necessarily to make any changes since Google doesn’t have any issues with crawling your site.
However, if you don’t see this message, you need to reconfigure your URL parameters. Please keep in mind that URL Parameters is not a direction like robots.txt.
It’s more like a hint and it’s all about crawling your site efficiently. Furthermore, URL Parameters are eligible only when you use key-value pairs such as:
- https://www.example.net/category.php?name=shirts
- https://www.example.net/category.php?name=jeans
- https://www.example.net/category.php?name=accessories
But, URL Parameters are ineligible when you use URLs such as:
- https://www.example.net/category/jeans
- https://www.example.net/category/jeans.html
- https://www.example.net/category+jeans
They simply don’t follow key-value pairs and because of that - they are ineligible. Since URL Parameters are a topic for itself, I suggest you watching this video.
Security Issues
Security is very important to Google. If your site contains malwares, harmful downloads, deceptive pages and things like that, you are in the risk zone for getting penalized.

Anyway, Google will always tell you where is exactly the problem. Once you fix the problem, you can request a review.
Of course, you need to explain steps you did in order to remove a warning for users (photo above).

As for example, let’s assume that your site has the Content injection issue. If you click on Show details here is what you can see.

Now you know what is the problem. When you solve the issue, you can submit a request, as I’ve already mentioned.
Other Resources
This is a page which contains the list of useful resources.

For example, this is where you can find the URL of Google PageSpeed Insights which is great for check how your site fast is.
Also, you there are other useful tools like Structured Data Testing Tool, and so on.
Conclusion
Google Search Console, ex. Google Webmaster Tools, is a powerful and free tool which every business owner MUST use.
There are so many useful features from search analytics to security issues. Without Google Search Console, how would you know what you have a problem with crawling? You would only know that something is wrong, but without this tool, you couldn’t get clear instructions.
Furthermore, ask yourself, how would you know for which queries does your site rank? Just think about (not set) issue in Google Analytics.
Finally, if you don’t have enough money to buy commercial tools for tracking link building campaigns, you can always use this free tool.